The Best of Zion and Bryce National Parks in 4 Days
- Lauren H
- Mar 26, 2021
- 12 min read
Updated: Sep 22, 2022
Hike through water-filled narrow canyons and surreal bright orange rock formations. This four-day itinerary packs in the best views and experiences in Zion and Bryce.

Jump Ahead to a Section Below:
Jump Ahead to an Itinerary Day Below:
Getting around Zion
As of 2020 visitors were required to either take the park shuttle bus, ride a bike, or hike/run to access the majority of the hikes in Zion. The main park drive, the Zion Canyon Scenic Road, was closed to visitor cars. The Scenic Road has since opened up to cars again, but there seems to be a trend amongst National Parks to try closing the main roads to car during busy season. I recommend checking here for the latest shuttle requirements and road closures before planning your visit.
There is an option to bike the same route as the shuttle with your own bike or with an electric or traditional bike rental. The route makes for a beautiful bike ride and allows you to take in the scenery better than you could on the shuttle. It’s worth biking the main road at least one of your days in the park.

Day One
Zion: The Narrows
Start your Zion visit off by hiking one of the most extraordinary trails I have ever hiked on, the Narrows. Plan for a full day to hike in this area and pack a lunch and snacks. Hiking the Narrows is a hike through a riverbed in a narrow canyon, where you will be walking in varying levels of water for most of the hike.

I’ve broken down my Narrows tips into two sections, feel free to jump ahead below.
Gear
I highly recommend renting gear at one of the local outfitters for the hike if you plan to hike in the Narrows for more than an hour (my friends and I hiked for 4.5 hours). The rental companies will rent out a package with canyoneering boots, neoprene socks, a wooden hiking pole and waterproof pants. I was traveling with a friend that thought his regular waterproof hiking boots, wool socks, waterproof pants and standard hiking pole would work fine. He ended up renting the gear and was happy with his choice. I’ve broken down the advantages of each rental item below.
Wooden hiking pole: A regular hiking pole won’t be helpful for balancing on the large rocks that you walk on. The larger wooden pole provides more stabilization and works well with the large boulders.
Waterproof pants: Typical waterproof hiking pants don’t have the scuba lining around the ankles that are on the rental pants. If you are hiking during a warm summer month, and water levels aren’t too high, you won’t need the pants. The rental companies can give you recommendations the day of.
Canyoneering boots: The canyoneering boots provide better traction than typical hiking boots and allow water to easily flow in and out of the boot. They are also designed to fit the scuba sock that likely won’t fit in your usual hiking boots.
Neoprene socks: These prevented blisters. They allowed the water to flow in and out of the boot and sock rather than a wool or cotton sock that retains water. The neoprene socks are designed to be wet, so your feet will get wet. They also help keep your feet warm.
Dry bags: They offer rental dry bags to keep your lunch, camera, phone, etc dry. There is nothing special about the rental dry bag, so I used one I already owned. If water levels aren’t too high then you won’t need one at all.

With the rental package we stayed completely dry everywhere other than our feet. We rented from Zion Outfitters and it cost $45 per person for the whole package. Advance reservations are not required.
The Hike
Take the Shuttle or bike to the Temple of Sinawava stop. From the stop, there is a 1 mile hike, the Riverside Walk, to reach the start of the Narrows water section. If hiking in water for hours doesn’t interest you, it is worth taking the short 1 mile hike on land. The Riverside Walk showcases the bright turquoise waters of the Virgin River and the surrounding fauna.
If you are completing the full river hike in the Narrows, I recommend bringing a pair of lightweight tennis shoes or hiking sandals for the dry portion of the trail. It saves you 2 miles of hiking in the heavy canyoneering boots and neoprene socks when they are unnecessary. It also feels great to be able to take off the wet boots and socks on the way back.
Once you reach the water portion of the hike, the trail continues for 5 miles each way out and back. You start the hike upstream so it will be easier and quicker coming back downstream.
*Note: There is an option to hike the full 17 miles downstream from the other direction, but an advance permit is required.
How difficult the hike is will depend on the water flow speed and the water level. Walking in waist high water for miles is significantly more work than walking in ankle high water. There is no real elevation gain on the hike, but it will still wear you out, no matter the water level. The rental outfitters will let you know the current water conditions for that day and can advise on risk levels for flash floods as well.
As you start the water portion of the hike, your first landmark will be Mystery Falls, a 110’ waterfall on the right hand side. You will then pass the Narrows Alcove and the Grotto Alcove on your left. Then there will be a fork in the river where you have the option to take a right into Orderville Canyon or continue on straight. At this point you will have gone about 2 miles in the river, plus the mile land hike. I recommend continuing straight to make it to the Floating Rock, a 45’ boulder in the middle of the river. This area will take your breath away. The crowds also thin out by this point.
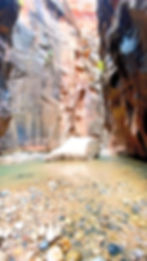
If you continue on even further you will find the most narrow sections of the canyon, and you may even have it to yourself. This narrow section of the river is considered Wall Street and you will know when it ends when the river starts to widen. The trail still continues on beyond Wall Street. The upstream path ends at Big Springs, 5 miles in (4 miles in water).
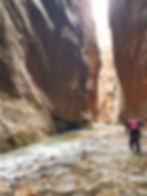
We turned around slightly before the end of Wall Street and then went back and explored the Orderville Canyon section of the river that forked off (previously on our right, then on our left as we were heading back). You will have to navigate around large boulders and pools of water, but then the trail leads to a small waterfall, Veiled Falls.

This fork section of the river also has more trees and plants than the other parts of the Narrows. We had this portion of the hike to ourselves as well.

We hiked all of these stops out and back in 4.5 hours including a stop for a lunch break along the river.
Once back at the park entrance we had beers and food at Zion Brewery. See Where to Eat for more details.
Day Two
Zion: Angel’s Landing and the Emerald Pools
Angel’s Landing
Permits are now required to hike Angel's Landing. Check here for the latest information on the permitting process.
This is an ideal day to consider biking into the park. You can bike in before the first shuttle departs. Bike or take the shuttle to The Grotto to start the hike.
Angel’s Landing is a 5 mile out and back hike with 1,630 feet in elevation gain. You will be going uphill for the majority of the hike. For the first half of the hike there are many opportunities to stop to catch your breath and to enjoy a view.

On the last .8 miles of the hike, the trail is so exposed, narrow and vertical at points, there are permanent chains to hold on to. If you are afraid of heights this is not an ideal trail for you. Otherwise anyone with hiking experience and hiking shoes or hiking boots can complete this hike. You will be rewarded at the top with stunning views looking down into the valley.

Emerald Pools
After you come back down from Angel’s Landing I’d recommend connecting directly to the Emerald Pools trail rather than riding the shuttle there.
The Kayenta trail is a 2 mile trail that connects the Grotto area to the Emerald Pools trails. There will be signage directing you to the Emerald Pools. The Kayenta trail winds along the valley with views of picturesque bridges and the Virgin River. It is a relatively flat trail.

It will end and connect with the Emerald Pools trail where you will first see the Middle Emerald Pools.

Next, follow the Emerald Pools Trail for one mile up to the Upper Emerald Pools. This stop was my favorite of the Emerald Pools; the pool has a vibrant green color and is located in a secluded canyon.

Hike back down the way you came in. You will hit the Middle Emerald Pools again but this time follow signage for the Lower Emerald Pools or signage to the Zion Lodge. It is about another mile hike to reach the lower pools. These pools also feature a waterfall over a cliff edge.

This trail ends at the Zion Lodge shuttle stop. The Lodge has a large lawn that is an idyllic spot for a picnic lunch.

Day Three
Zion- Observation Point
Observation Point via the East Rim Trail has been closed for a couple years due to a rockfall. When the trail reopens I recommend hiking to Observation Point via the East Rim Trail. It is an 8 mile hike with 2,100 feet in elevation gain. The trail climbs upwards in Echo Canyon and has panoramic views throughout the hike.
If the trail is still closed or if you prefer a less strenuous hike, there is an option to take the East Mesa Rim Trail to the same Observation Point. Observation Point was my favorite view in the whole park, I even preferred it over Angel’s Landing. It is higher up and further towards the edge of the park than Angel’s Landing. So whichever route you chose, I highly recommend making time to see Observation Point.

To hike to it via the East Mesa Trail you will need to drive to the trailhead. There is no shuttle stop there, the trail starts outside of the park’s borders. Part of the drive is off road so drive a vehicle with all wheel drive. To reach Observation Point on the East Mesa Trail, it is a 7 mile out and back hike with 700 feet in elevation gain. It is a relatively easy hike but there isn’t much to see until you reach the actual viewpoint.
Day Four
Day Trip to Bryce Canyon
Depending on where you are staying, the drive to Bryce Canyon is 1-2 hours. Staying in Kanab instead of Springdale will make the drive to Bryce Canyon shorter by about 30 minutes. See Lodging for more details on the towns.

For a one day visit to Bryce Canyon below is an outline of the best day hike options.
1. The Fairyland Loop Trail- A 7.8 mile trail with 1,545 feet in elevation gain. It is usually a less crowded option. If you decide to hike this trail, also add on a short 1.3 mile hike on the Navajo Loop to see Wall Street. Wall Street is a highlight of the park, so don’t skip it!

2. The Queen’s Garden and Navajo Loop- This combines the two loops for a 2.9 mile hike with 600 feet in elevation gain. Start the trail going in a clockwise direction.
3. Peekaboo Loop-A 5.5. Mile trail with 1,571 in elevation gain. The hike is on a steep trail that takes you through the center of the park. You will be able to see the Wall of Windows as part of the trail. Start this route clockwise.
4. Navajo and Peekaboo Loop Trails- Combining these two trails creates a mini figure eight for 4.9 miles and 1,581 in elevation gain. You will be able to see Wall Street, the Wall of Windows and the center of the park. Start this route clockwise.
5. The Figure Eight Combination: Queen’s Garden, Peekaboo Loop, and Navajo Loop - Combining these three trails totals 6.4 miles and 1,631 in elevation gain.

My friends and I opted to hike the figure eight combination as it showcased the best of the park for a one day visit. It was a unique hike with tunnels and archways carved into the rocks and varying terrain and views throughout the hike. It kept you interested and in awe the whole time. Start the hike clockwise so that you end in the Wall Street section.

If I spent a 2nd day in Bryce Canyon I would have also hiked the Fairyland trail, it was recommended by multiple fellow travelers we met.
If you have time, stay and watch the sunset at Sunset Point, it’s easily accessible from the parking lot.
Build an Itinerary with Zion and Bryce Stops
This itinerary works well as a stand alone long weekend trip. We visited Zion and Bryce as part of a longer Utah road trip that started with Moab, Arches and Canyonlands and then continued on to Lake Powell and ended with Grand Staircase Escalante and Capitol Reef. Click on the links for blog posts for each of those areas as well. If you want to build a longer 2 Utah road trip check out this post on how to put it all together too.
Lodging near Zion and Bryce
There are many hotel, Airbnb rental options and campsites in and around Zion. Springdale is the name of the town at the base of the park and it is the most convenient place to stay to quickly access the park early everyday. Most of Springdale is walkable to the park. Staying in the campsites inside the park is another option to be close by. Camping in the park makes it easier to beat the crowds on trails.
If Springdale lodging is too expensive, or too booked up, Kanab is a cute town about 40 minutes away from the park. It has less expensive lodging options. The restaurants are also less expensive in Kanab. Staying in Kanab also shortens the drive to Bryce Canyon.
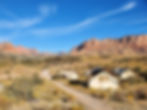
My friends and I wanted to try the trending glamping experience and stayed at Under the Canvas Zion. It is a glamping site 30 minutes away from the park. We stayed in a safari style tent with proper beds and linens and views of the backside of Zion. They had common bathrooms but with stylish individual shower/toilet rooms. There is also a communal dining area, outdoor fire-pits, outdoor games and s’mores for the evenings. It was a fun experience that I recommend!

Advanced Bookings for Zion
Track what day Zion Shuttle Tickets will be released for purchase and purchase them right away that day and time. Lodging in Springdale, Zion campsites and glamping also fill-up well in advance.
What to Wear and Pack for Zion and Bryce National Parks
What to Wear
Hiking boots or shoes
A waterproof jacket for the Narrows (if water levels are high)
What to Pack
A daypack for hiking- The Arc'teryx Index 15 is my favorite.
A water bladder- I think the Osprey hydration packs are the easiest to fill and use.
A drybag- This will allow you to pack snacks, a phone, etc and keep them dry while in the Narrows, you could also rent one. Sea to Summit dry bags are my favorite.
Where to Eat near Zion and Bryce
In Springdale
This restaurant is conveniently located right outside of the park entrance, it almost feels as though it is in the park. They have a large outdoor patio with heaters and views of the park. The brew pub offers a classic American menu and also sells their own beers, and flights of beers. We ate here twice, not only because it was convenient but the food was delicious too.

It is a quick, easy, breakfast, lunch or dinner stop. They have outdoor seating and offer smoothies, sandwiches, wraps and vegan options.

This Mexican restaurant has a large outdoor patio and offers traditional Mexican dishes as well as burgers, wraps, salads and vegetarian options.
In Kanab
They serve salads, burgers, steaks, bison, pasta, enchiladas, and vegan options. It has a fun, relaxed atmosphere (they intentionally don’t offer wifi) and offers outdoor seating options.
This shop sells fresh juices, smoothies and nut milks. They will also turn any smoothie into a bowl option. It’s perfect for a pre or post hike stop.
On the drive between Kanab and Bryce National Park
Cave Cafe
This is a road-side stop between Kanab and Bryce National Park. They sell smoothies, juices and Acai bowls.
Getting Around Zion and Bryce
To follow this itinerary you will need to rent a car. The Springdale town itself is walkable, and the shuttle service can take you around the Zion Park, but to go anywhere else you will need a car.
When to Go to Zion and Bryce National Parks
We visited Zion and Bryce in late October. The park is open year round but many of the restaurants and stores close for the winter, and hiking trails can be more difficult or inaccessible depending on snow and ice conditions. The Narrows hike will be colder in the winter, as the water temperatures drop. There is a higher chance of the Narrows hike being closed in the spring, when the snow melt creates high water levels. The park will only close the trail for the necessary day(s) and then will re-open it quickly.
Additional Reading: Grand Staircase Escalante and Capitol Reef, Yellowstone, Grand Teton and Jackson Hole, Lake Tahoe and Yosemite, Lake Powell, 2-week Utah Road Trip, Moab and Arches
Trip Dates: October 2020
Article Updated: March 2021
*Some links in this article are affiliate links that I receive a small commission for at no cost to you.